Reshaping the AeroCarb Needle
|
40 Hours worth of flight testing and a study of slide carb geometry lead me to the conclusion that the #2 needle I was using in my AeroCarb was not shaped optimally. Flight testing showed that the carb was running rich at low power, and slightly lean at high power. The fuel metering needle used by the AeroCarb is a cylindrical brass rod, with a taper cut or ground into it. The tapered rod (needle) moves with the slide, and as the slide moves out, so does the needle. Because of the taper, more fuel is allowed to flow into the engine because less needle is in the way blocking it. The diagram below should help explain this.
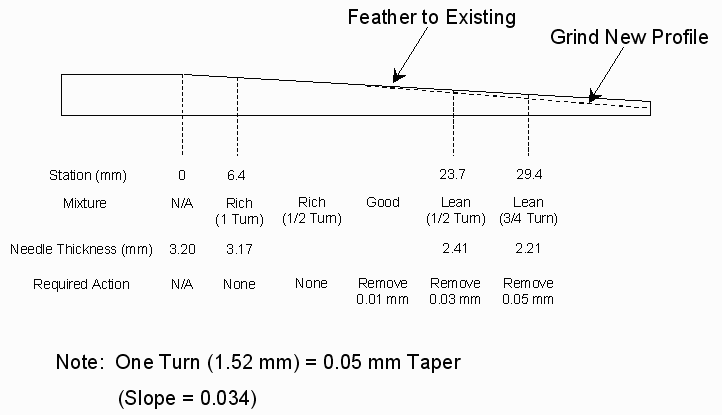
 The actual temperatures change on every flight, but a generalized Exhaust Gas Temperature (EGT) trend was developed and added to the diagram, as well as the mixture setting, in terms of needle turns. All references to rich or lean were to the starting mixture setting, which was right on at about 3/4 throttle. This produced the following needle profile:
 With this data, we know if the taper of the needle is too much (i.e. allowing too much fuel), or not enough (too lean). Knowing how many turns we need to make in order to adjust the mixture will allow us to estimate the amount of needle we should remove. In order to calculate this, you'll need the slope of the taper. In my case, it was 0.034. This is a dimentionless number, but can also be thought of as 0.034 mm or taper per mm of length. Measure the length in which the needle is advanced for each turn (thread pitch of the adjustment screw), and we can calculate the amount of taper for one turn. In my case, this was 0.05 mm. Lastly, we can do the math and convert turns rich/lean to mm of material needed to remove from the needle. For example, if we're 3/4 turn lean at WOT, then 0.75 turns * 0.05 mm/turn = 0.0375 mm removed. So, shave off approximately 0.03 mm at the exact point where WOT is reached (in my case, station 29.4 mm), and the needle will allow the proper amount of fuel to pass.
So much for the theory... The reality of making this work is much more complicated. Every change, no matter how small, will affect the performance of the needle. You have to work very hard to control these second and third order effects, or you'll spend way too much time chasing the mixture. I know this from experience. I re-tapered 3 needles. Each one had its own mistakes, and the frustration level was pretty high. From my experience, I'll offer a few points.
|
NOTE: If you do not see a menu frame on the left, click here to reload the full page.
Updated: 19 May 08